
Before I did, though, Little Man saw it on the kitchen table. He looked at it very strangely and then asked me what it was. I explained to him what I was trying to do, and that I was a little frustrated because it wasn't working quite like I had hoped.
He nodded his head wisely and then said, "I see what you mean, Momma. They are WAY too sparkly!"
Bless you Little Man. Sometimes you know just the right thing to say. I was being Little Miss Impatient, and should have known to wait until it was completely dry before I pronounced the project an epic failure. And I also should have known that I would be the only one to see the flaws and globs in the finished product. Everyone else would be blinded by their sparkly beauty.
I have been wanting to try and make my own glittery shoes from a DIY tutorial that I found on Pinterest. Yes, I know. I spend WAY to much time on Pinterest. But I have actually tried several crafty things and quite a few recipes that I found on there. So I consider it time well spent.
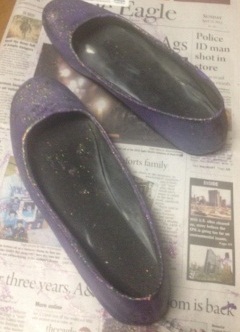
Deciding to take an old, raggedy pair of black flats that I never wear and was considering throwing out, my first stop was to Michael's to pick up glitter and Mod Podge (and I had my handy-dandy Michael's app that gave me a 20% off my entire order coupon). I chose Recollections Extra Fine Glitter in Fairy Dust and Mod Podge in Gloss.
I started by scuffing the shoes with a nail file (sandpaper would work, too) to give the glitter mixture something to stick to. Then I mixed the glitter and Mod Podge. There was no exact science or formula, but next time I will go with a higher glitter to Mod Podge ratio from the beginning. Then I started painting it on.
Next time I do this... and trust me, there will be a next time... I will make my layers thinner and will watch for globs and drips more carefully. Once they are dry, I found that there was not a lot I could do about them. I will also use either a soft-bristle brush or a sponge. The paintbrush I was using just left way too many streaks. 90% of them did disappear when the Mod Podge dried, some of the streaks turned into globs.
If you do this, watch the edges and toe very carefully for globs and to make sure that you are covering the entire area. I almost missed a couple of spots around the sole of the shoe.
It took me four layers to get the coverage that I wanted. Keep in mind that I was trying to cover up some mistakes with some of these layers. Also, next time I will start with a light-colored shoe instead of a dark-colored shoe if possible. The dark color underneath changed the color of the glitter more than I would have liked.
Just apply the number of coats that you desire and then let dry. Once dry, find an outfit to wear that goes with your new, improved, sparkly shoes!!


No comments:
Post a Comment