Saturday, August 11, 2012

Overnight Yeast Doughnuts - Best Recipe I Have Tried!

Last weekend, I found my favorite waffle recipe to date, and this weekend I found the best doughnut recipe that I have tried so far.  The doughnuts turned out light and fluffy and really tasty.  It is a two-day process and does take some work, but I was in the mood to cook last night and the prep work this morning wasn't too bad.

First, make a sponge from warm water, yeast, and flour.

When you mix the yeast and water and let it sit, be sure that it blooms before you add the flour.  For me, this always happens at the very last part of the allotted time.  Please note that the pictures of the yeast blooming are taken just seconds apart.  Just in case you have not worked with yeast before, I wanted to show what the process looks like.


Let it sit for 30 minutes to an hour.


Cream the butter and sugar.


Add the eggs, vanilla, and salt.


Add the sponge mixture and flour, and switch to the dough hook on the mixer.  Mix until the dough pulls away from the side of the bowl and clings to the hook.


Butter the sides of a large bowl, and let the dough rise in a warm place for an hour and a half to two hours.  It should be double in size.  I keep my house pretty cold during the summer months, so I have found that I have to set my oven on the "Warm and Hold" setting and leave it on for about 15 minutes.  Then I turn it off and put my dough in to rise.  This method seems to make the dough rise perfectly.


I deviated from the original recipe a bit here.  I punched the dough down, but left it in my large bowl because the bowl had a lid.  I covered the top of the dough in plastic wrap, put the lid on, and left it in the refrigerator overnight.

The next morning, roll out the dough to about 1/2" thickness on a floured surface and cut with a doughnut cutter.  I found that thickness is important.  My first try was too thin and my next try was too thick.  Once I found a happy middle, they rose and cooked perfectly.


I put the doughnuts and doughnut holes on parchment paper on cookie sheets, and put in the oven to rise for another 30 minutes.


While they were in the oven, I prepared my glazes.  These are the same glazes that I use every time I make doughnuts.

Plain Glaze:
1 cup powdered sugar
1/2 tsp vanilla
4-5 tablespoons of milk (more or less, depending on preferred consistency)

Cinnamon Sugar
1/2 cup of granulated sugar
1 tsp cinnamon

Chocolate Glaze
1 cup powdered sugar
1/4 cup dark chocolate cocoa powder
4-5 tablespoons of milk (more or less, depending on preferred consistency)


Of course, these can be adjusted to taste.  This is just what I have found works for my family.  A couple of side notes... The pictures will indicate a really dark-colored cinnamon.  This is because I was working before my second cup of coffee and started pouring the cocoa powder into the granulated sugar.  Once I realized what I was doing, I scooped as much of it out as I could, but there were some leftover bits of cocoa powder in the mixture.  It wasn't bad, even though it was a total accident.  Also, I decided to experiment this morning and use cooled brewed coffee in place of milk for my chocolate glaze.  It was pretty tasty as well.

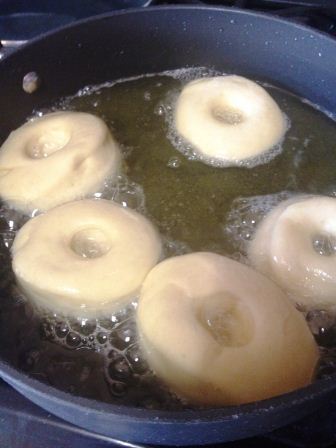
Heat the oil to between 350-375 degrees.  Once the doughnuts are risen, fry the doughnuts in the oil for 1-2 minutes on each side (until they are golden brown).  Be sure and turn them quickly.  If they fry too long on one side, they get heavy and tend to keep flipping onto the heavy side.  This is especially important for the doughnut holes.


Once the doughnuts are fried, I let them cool on a cooling rack sitting on a cookie sheet.  Then, I dip them into the glaze of choice and put them back on the cooling rack.


Deputy D and Little Man agreed that this is the best recipe I have tried so far.  Deputy D would like the dough itself a little sweeter, so if anyone has any ideas on how to tweak this recipe to make it a sweeter dough, please let me know!

Tuesday, August 7, 2012

Truthful Tuesday - Airing My Dirty Laundry

"I like hugs and I like kisses, but what I really love is help with the dishes!" ~Author Unknown

Truthful Tuesday is here once again.  Pondering what to share this week, I came to the conclusion that I should share one of my dirty little secrets.  I hate to clean.  No, really.  I HATE to clean the house.  I would rather go get a root canal or sit through a daylong, boring lecture about a subject I don't care about than sweep, mop, vacuum, or do laundry.

That's not to say that I like things messy or dirty.  Clutter doesn't bother me as much as it does Deputy D.  On the contrary, clutter makes me feel safe and happy and surrounded by items that I love.  But I don't like things dirty or messy or laying all over the house.  I just don't want to be the one to clean it up.

I blame this entirely on my mom.  Let me interject here that I love my mom, and I have forewarned her that she may pop up occasionally on the blog.  She was hesitant, but said that the understood how important this writing was to me, so she would try and be understanding.  This being said, I will be calling her as soon as I post this to let her know that I love her no matter what her quirks are.  Everyone has them.  Deputy D could write a book about mine.  One of hers just happens to be liking things extremely neat and clean all of the time.

At any rate, back to blaming my mom for my loathing of cleaning and chores.  Growing up, this is how a typical Saturday went down at our house.  Wake up at 7:00 a.m., clean the bathroom, do laundry, clean the bedroom, do more laundry, wash dishes, vacuum, do yet more laundry, dust, take out the trash, sweep, still more laundry, do the dishes again, finish the laundry, go to bed.  My mom's recollection of Saturdays growing up is quite different and consists more of her cleaning the house while my brother and I argue with her about helping.  Dad's view (very wisely) is very similar to mom's.  While my brother's is somewhere quite firmly in the middle.

Keep in mind that my mom worked both a full-time job and a part-time job to help take care of us, and Sundays were reserved for church and resting.  In her defense, this really only left Saturdays for the housework and chores.

Still, I stick to my contention that having to clean the house from dusk until dawn every Saturday made me hate cleaning with a passion.  Deputy D knows very well that if we ever win the lottery, Merry Maids will be my first call, even before we call our parents or call to quit work.  It was even worse last year when I was so depressed.  I was tired and apathetic and just didn't do anything around here like it should have been done.  Laundry piled up on the couch for weeks at a time.  Dishes piled up in the sink until Deputy D had time to deal with them.  You get the picture.

It doesn't help that once I started cleaning again, I felt like I was picking up after Deputy D and Little Man constantly.  Deputy D likes to leave cups laying all around the house and outside.  I find cups in the garage, on the back porch, and in the driveway by the cars.  Little Man likes to leave his dirty clothes on the floor in his bathroom and his closet.  He has laundry baskets in both places, but refuses to actually hit them.  The clothes go on the floor right beside the baskets.  Every day.

I do not pretend to be innocent.  I have a strange hang-up to where my shoes have to be kicked off right as I walk in the door.  So unless we know there is company coming, you can find a week's worth of my shoes piled up by the front door on any given day.

And I dirty up every pot and pan and spoon in the kitchen when I cook.  It's really bad, and blame this one completely on my dad.  He does the same thing.  Mom hates it when he cooks because she has such a huge mess to clean up.  I submit the following photos from Sunday's lunch as proof that I am not exaggerating.


Right.  Rambling again.

So we had to come up with a solution that worked for both of us, to where the workload was small enough that we could handle it and that we could both share the workload enough to  make it manageable since we both work full-time.  I came across some ideas on Pinterest and also from a friend's chore schedule that I found on her refrigerator one night while I was visiting.

We decided to make a schedule that included cleaning up one room and doing one load of laundry every day.  We don't necessarily do a deep cleaning of the rooms on the schedule every time, sometimes just a quick pick up to make the rooms presentable.  Also, we left Little Man on his own with his room.  It seems to be working out really well for us.  I just glance at the chart each morning, and do what I can before I leave for work and even at lunch.  Then I finish up after dinner, and usually have a little time left to relax and watch a few minutes of TV or read with Little Man.

I am not sure if it helps anyone, but here is the schedule that we came up with:

Sunday - Sheets (Laundry), None (Cleaning)
Monday - Deputy D's Clothes (Laundry), Living Room (Cleaning)
Tuesday - Little Man's Clothes (Laundry), Little Man's Bathroom (Cleaning)
Wednesday - Towels (Laundry), Master Bedroom (Cleaning)
Thursday - Whites (Laundry), Master Bathroom (Cleaning)
Friday - Jeans (Laundry), Office (Cleaning)
Saturday - My Clothes (Laundry), Kitchen (Cleaning)

Of course, we do the dishes and pick up the kitchen every day.  The cleaning on Saturday is more of a deep cleaning.  Spreading the laundry out to one or two loads a day has made it immensely more manageable than what we were doing before.  Which was basically trying to do all the laundry in one day for a whole week's worth of clothes for a family.

I hope this helps someone out there that detests cleaning and chores as much as I do to know that there is a way to make it manageable, if not pleasant.

Monday, August 6, 2012

Make Something Monday - Star Wars Pillow and Pillow Case

To go along with the curtains in Little Man's room, I made a small pillow and a pillow case for his body pillow.  A pillow was the very first thing I learned to sew, so there was not nearly as much heartache involved in this project as there was with the curtains.

For the pillow case, I used his current case and cut the fabric a bit bigger.


Next, I sewed a hem for the opening, and then stitched down a length of velcro that covered the entire width of the opening.


 Finally, with the inside facing out, I stitched the bottom and the long side closed.  Then I just flipped it right-side out, put the pillow in, and closed the velcro.


For the small pillow, I just trimmed out my remaining fabric to a small rectangle shape.  Again, with the inside facing out, I stitched around all edges, leaving just about a 1/2" hole for stuffing.  I flipped the fabric right-side out and stuffed the pillow as full as possible.


Once it was completely stuffed, I just hand-stitched the hole closed. 


Little Man loves the small pillow because he can stuff it anywhere to get comfortable, and he often uses it on the floor when watching TV.  And it only took about 20 minutes total to complete!

Sunday, August 5, 2012

Best Waffle Recipe Ever!!

I love waffles, and have been experimenting with different recipes to find one that is the perfect balance of taste ease of preparation.  I have a couple that I really like, but involve whipping egg whites and folding them into the batter, and I just usually don't have the time for that much preparation.

I also have been experimenting with sourdough starter.  Lo and behold, I found a recipe on the King Arthur Flour site for Overnight Sourdough Waffles.  (On a side note, this site is a great resource for fledgling bakers!)  The beauty of this recipe is that most of the prep work is done the night before, and you just leave it sitting out on the counter overnight.  Mix a few ingredients in the next morning, pull out the waffle maker, and you are good to go.

The night before, you mix a cup of your sourdough starter straight from the fridge and mix with flour, sugar, and buttermilk.  This is a great way to discard some of your starter before you feed it.  I can really see myself making these waffles a weekly Sunday morning breakfast.  Also, if you do not keep buttermilk on hand, you can add one tablespoon of white vinegar to just under one cup of milk and let it sit for five minutes.  I almost never have buttermilk, so this is the trick I frequently use.


Cover the mixture and let it sit out on the counter overnight.


The next morning, mix in the melted butter and egg mixture and then salt and baking soda.  The batter will be light, fluffy, and spongy.


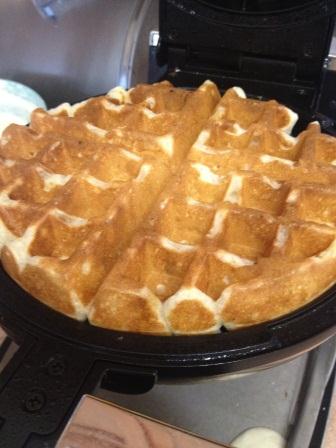
Pour the recommended amount of batter into the waffle maker and you will have golden, beautiful waffles in no time.  The outside is light and crispy, and the inside is fluffy and tangy.  These waffles can be topped with your favorite toppings.  We have only used the classic butter and syrup, but next time I have strawberries and whipped cream on hand, we will definitely be trying that.  Also, because they are tangy and not overly sweet, I can see even savory toppings working well.


I hope you get to try these soon.  And I can definitely share sourdough starter with my local friends if you don't have your own!

Wednesday, August 1, 2012

Wordless Wednesday - Little Man's Star Wars Room

We have serious lighting issues in Little Man's room, so I apologize for the poor quality of these pictures!